My favourite tools to use in Procreate!
Procreate is probably one of the most well know drawing apps out there. Its easy to see why! With a myriad of tools and brushes to choose from there is a lot to play with. But when you are first trying to find your way around that can be pretty daunting!
Today I’m going to take you through 6 of the tools I use the most when designing my patterns in procreate:
Gel pen
Layers
Colour picker
Selector tool
Inserting a photo
Symmetry tool
This is by no means an exhaustive list of all the tools I use, let alone all the ones I don’t! Ive been using procreate to design my patterns for over a year now and I can safely say that I have barely scratched the surface
It may help for context to know that I use procreate on an iPad Pro with an Apple Pencil.
The gel pen
The gel pen brush on procreate is by far and away the one I use most often!
I have it set not to alter the opacity or thickness of the line dependent on pressure from my Apple Pencil so it always creates smooth even finish the anything I’m drawing.
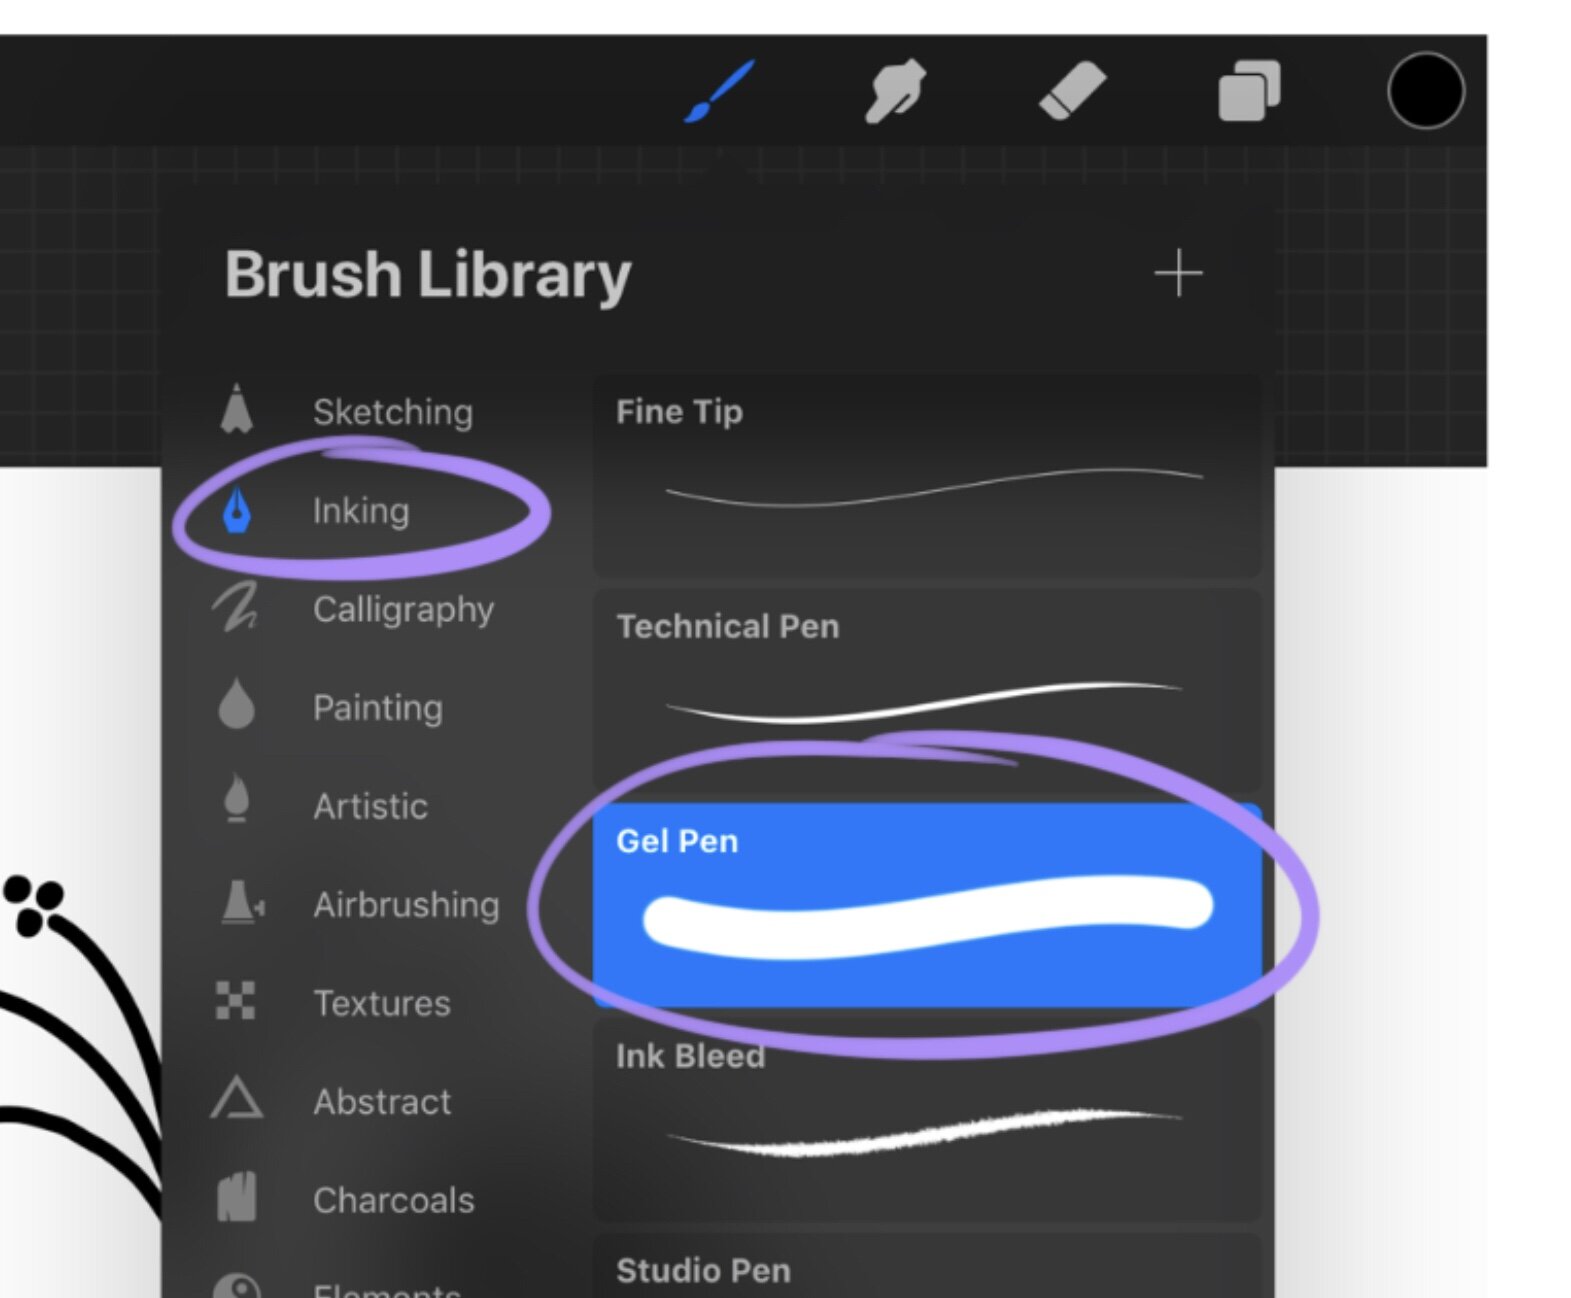
You can find the gel pen here by clicking the brush symbol in the top right of the screen and then selecting inking and gel pen.
If you click on the gel pen option again once it’s selected you will also be able to alter its settings such as thickness and opacity limits, pressure settings etc.
Working in layers
Working in layers is something I do every time I design.
Its a great tool to use if you want to see how changing something might look without damaging your original design.
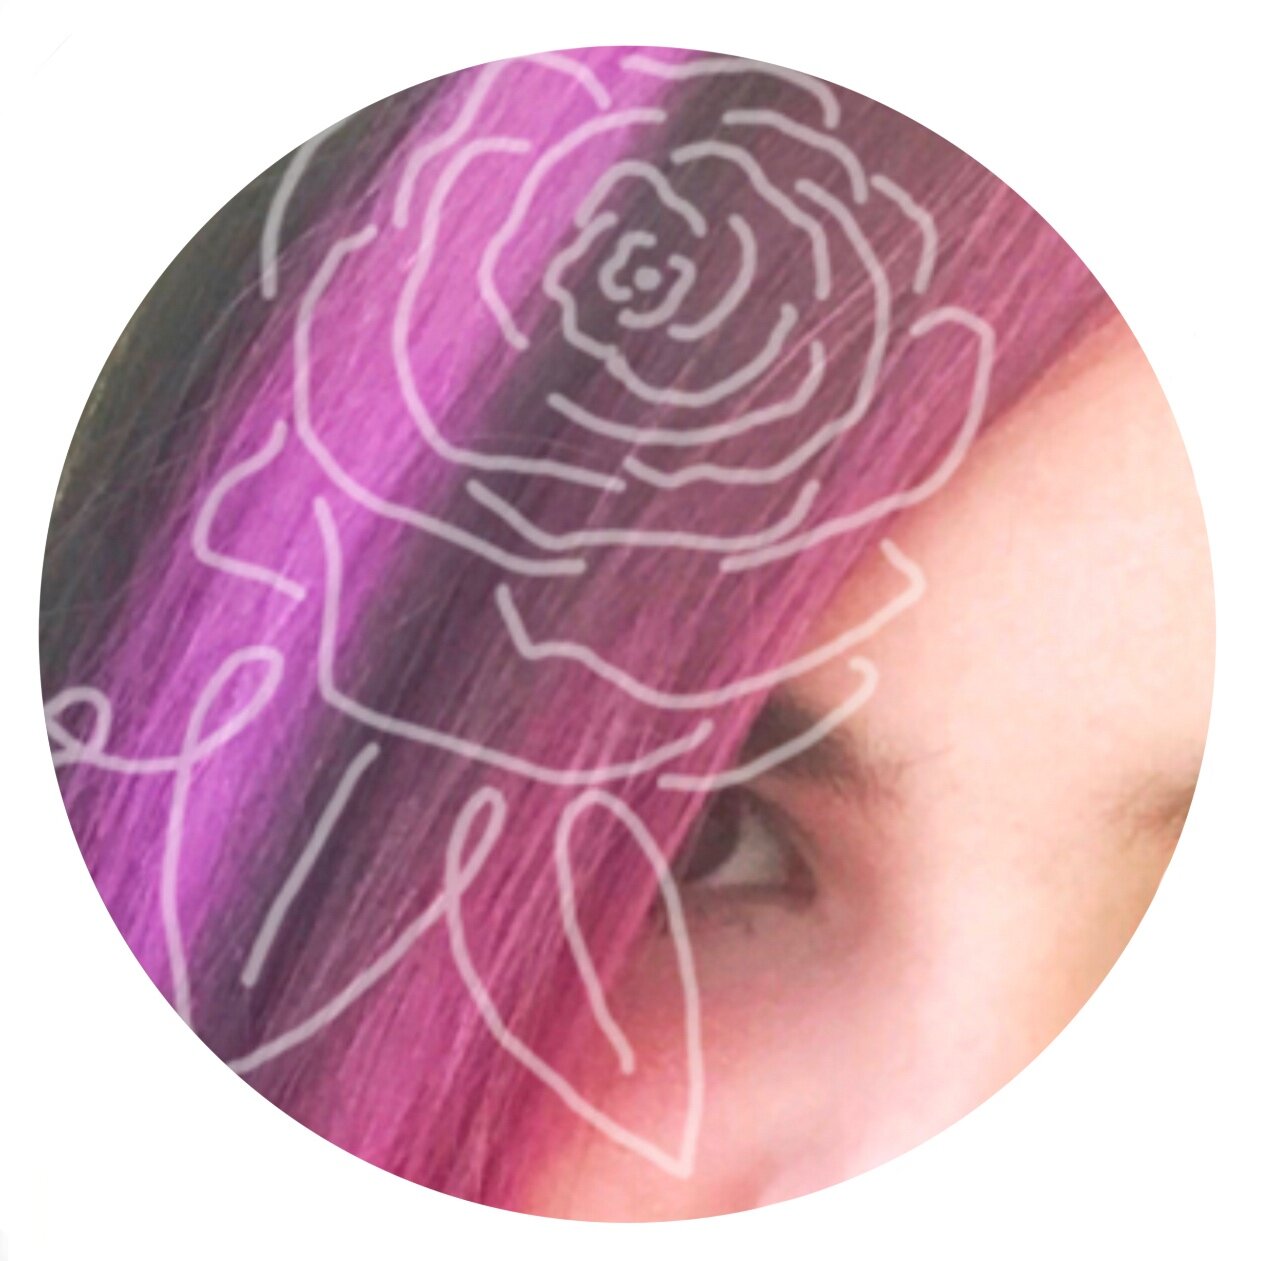
When I’m creating blackwork patterns I work the digital drawing on a top layer with the grid on a layer underneath. This means when I’m done with the pattern I not only have that but if I remove the grid layer I also have a digital version of my design as well. Its also really helpful if I go wrong because I can rub out the mistake without damaging the grid underneath.
Another thing I like to use layers for is adding colour to my designs
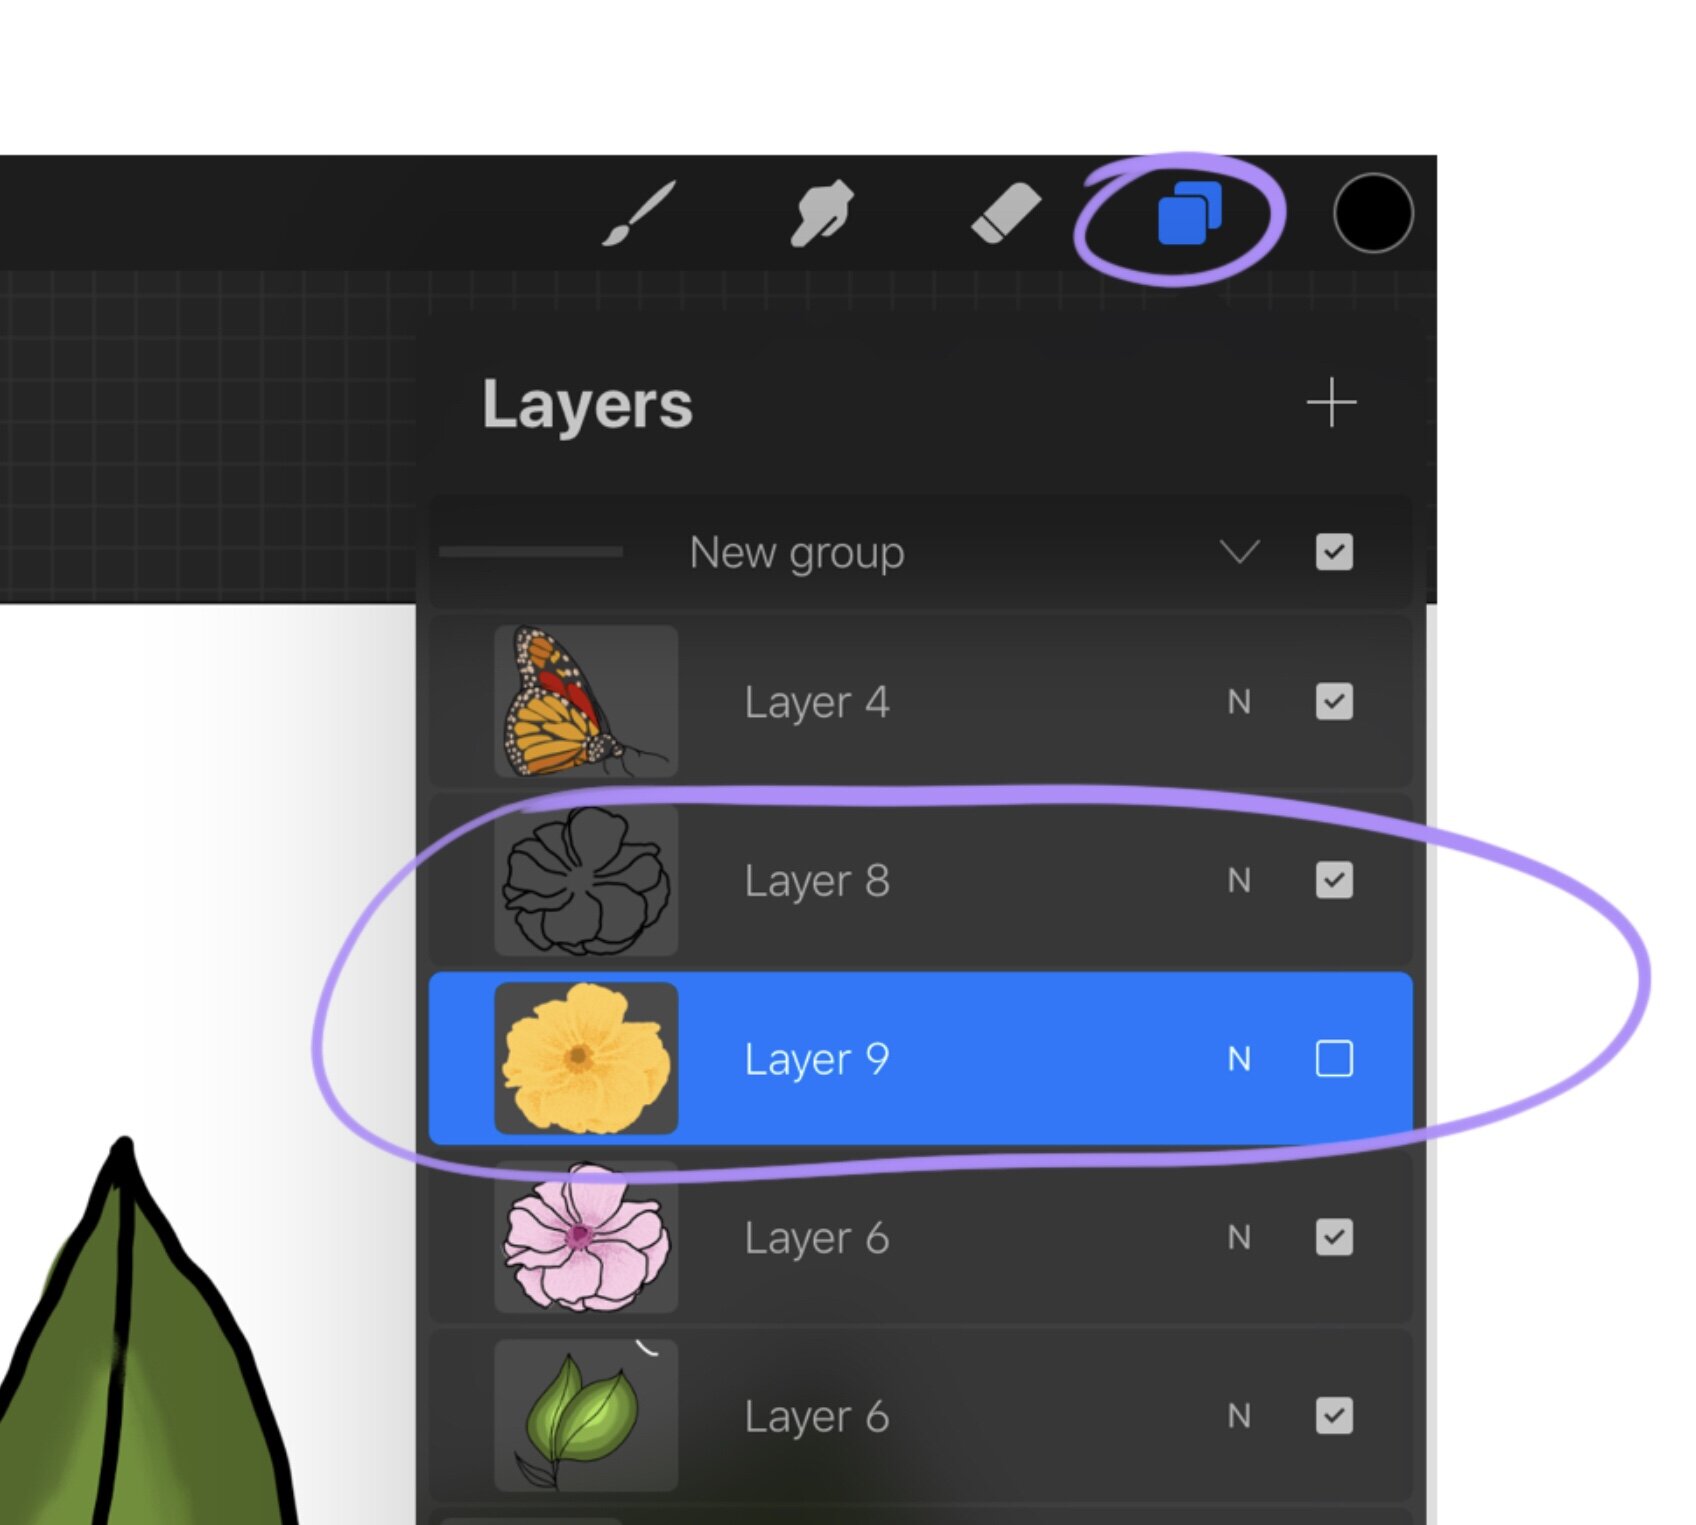
To open your layers, tap the button on the top right that looks like two squares.
You can see here with the layers I have circled that the outline of the flower is separate and above the colouring. This not only allowed me to try out several different colour versions without affecting the original drawing but it also allows me to colour more neatly.
Because the outline layer is above the colour layer, if I go into the outline when adding the colour it wont show because that bit of colour will be hidden by the outline. It would only be able to be seen if you then remove the upper layer with the original drawing.
Once you are happy with your drawing, or a part of your drawing, you may wish to merge the layers together. To do this, chick twice on the upper layer that you want to merge. Then select the merge down function and both layers will now be as one. (Make sure that both layers are visible when you do this or the one that isn’t will simply disappear. The tick to the right of the layer shows if it is visible or not.)
Another useful trick to know with layers is that if you press on a layer and hold it down you will then be able to move it up and down the layers list. This will allow you to put whichever layers you want in front or behind regardless of the order they were created in. In the picture above you an see that layer 4 is above layers 8 and 9.
The colour picker tool
If you are working from a reference photo, or want to find a colour you used before to use again then this is the tool for you!

Between the opacity and size sliders on the left of your screen there is a small box. If you click it then a 2 toned circle with 4 dots in the centre will appear over your work. The bottom have of this circle represents the colour that your brush is already. The top is the colour, in-between those 4 dots, that your brush will become.
You can now move the circle around your piece to select the exact colour you want to use!
This tool is especially useful if you are working from a reference photo.
Have this photo on one of the layers in your document and then you can pick the exact colours you need directly from your photo!

If you are working with a particular colour pallet for your pice then I would recommend swatching the colours you use as you go at the side of your canvas. This is really useful when you need to go back to a certain colour but is also great for if you’re designing embroidery patterns as I do because you can now use that pallet to pick your thread colours.
Inserting a photo
This one is such a useful tool to allow you to have your reference photos right there in front of you beside your drawing.
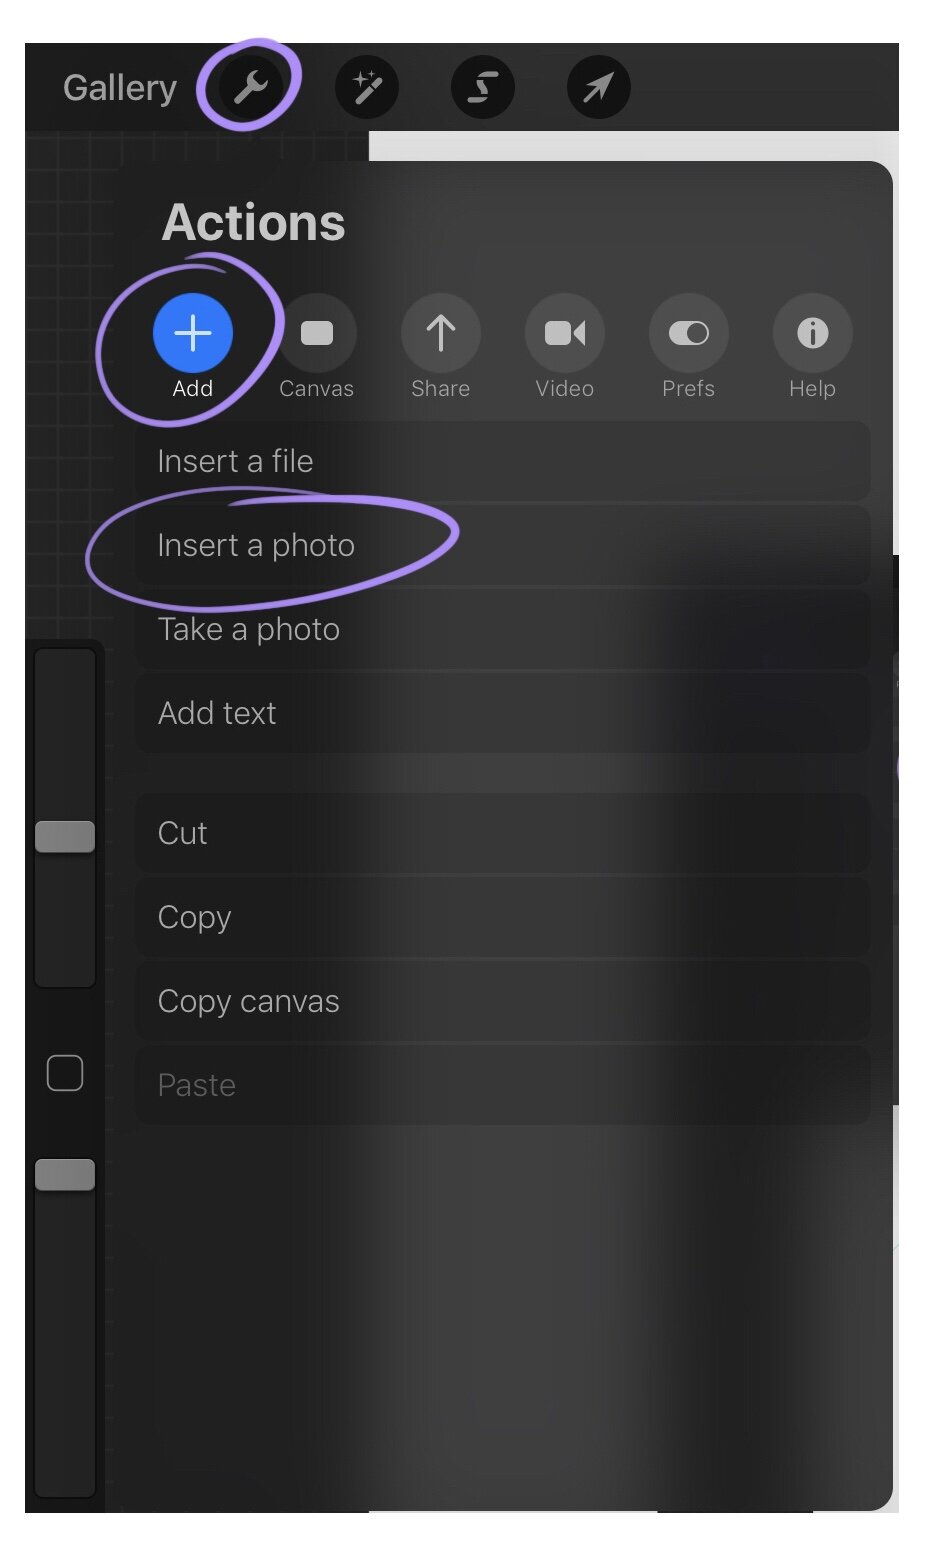
Simply click the spanner symbol in the top left, select add and then insert a photo.
If you are working on an iPad like me then it will automatically open up your camera roll for you to select a photo.
The SYMMETRY tool
Or assisted drawing as I think its more properly called.
This isn’t something I use particularly often but it is a really fun tool that i have found helpful in the past so I’ll talk you through it.
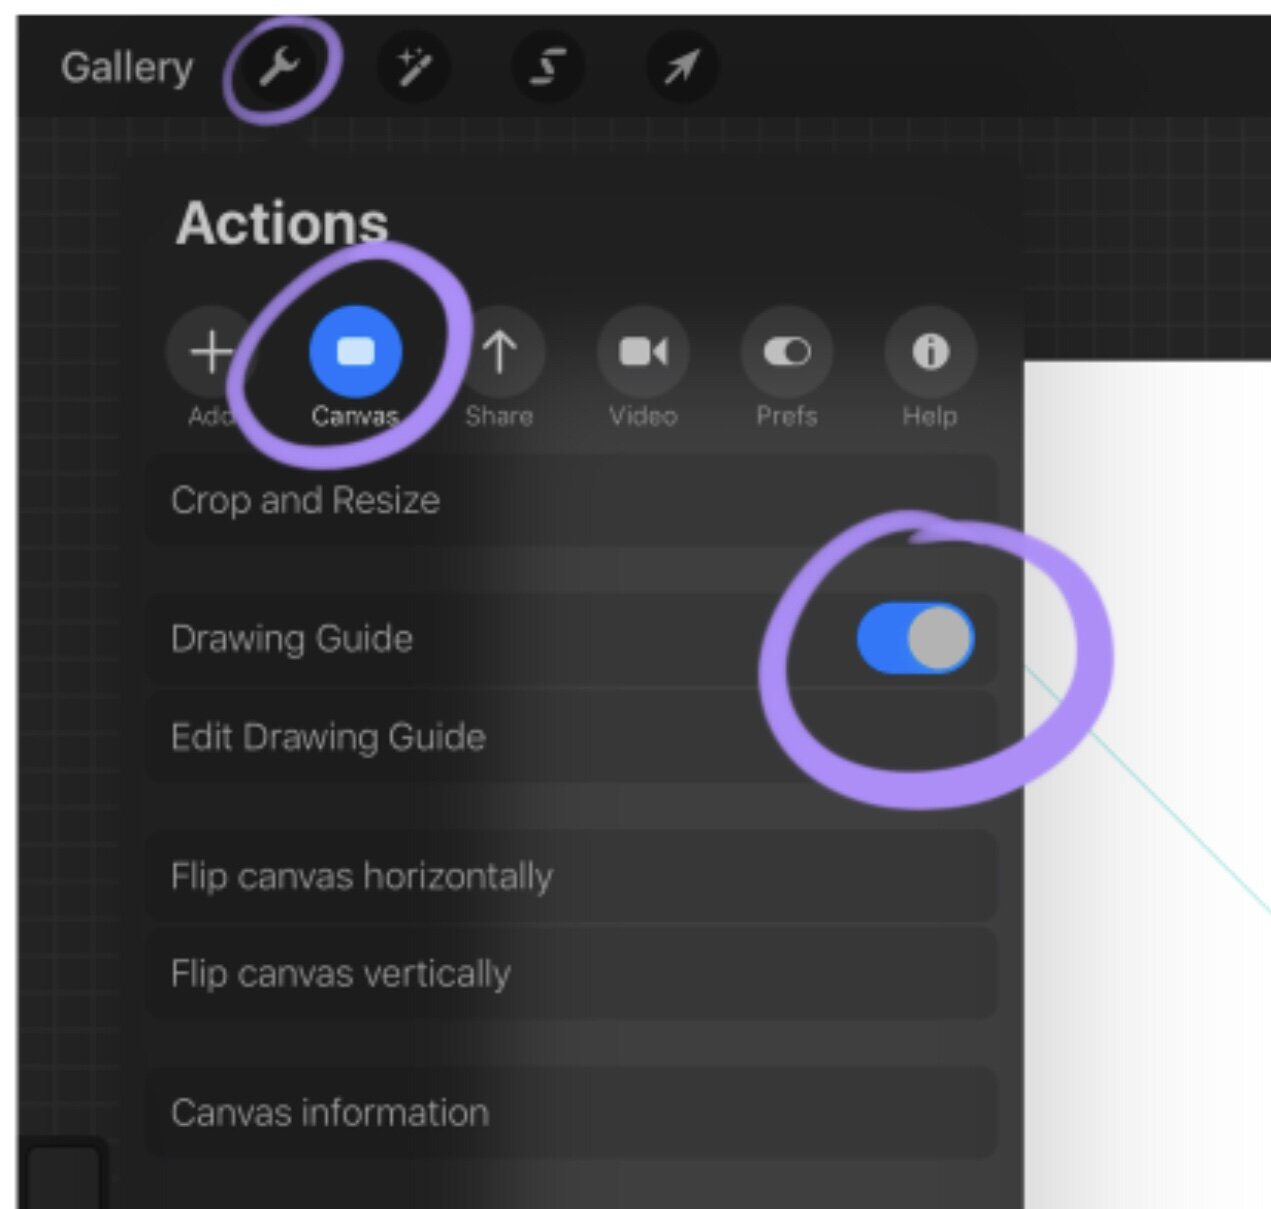
To access your the tool you need to go to the actions bar again and then click canvas and make sure your drawing guide is visible.
Don’t worry about when might appear at this point, it’ll just be the preset function and I’m about to tell you how to change it!
First thing to do: click on the option to edit the drawing guide.
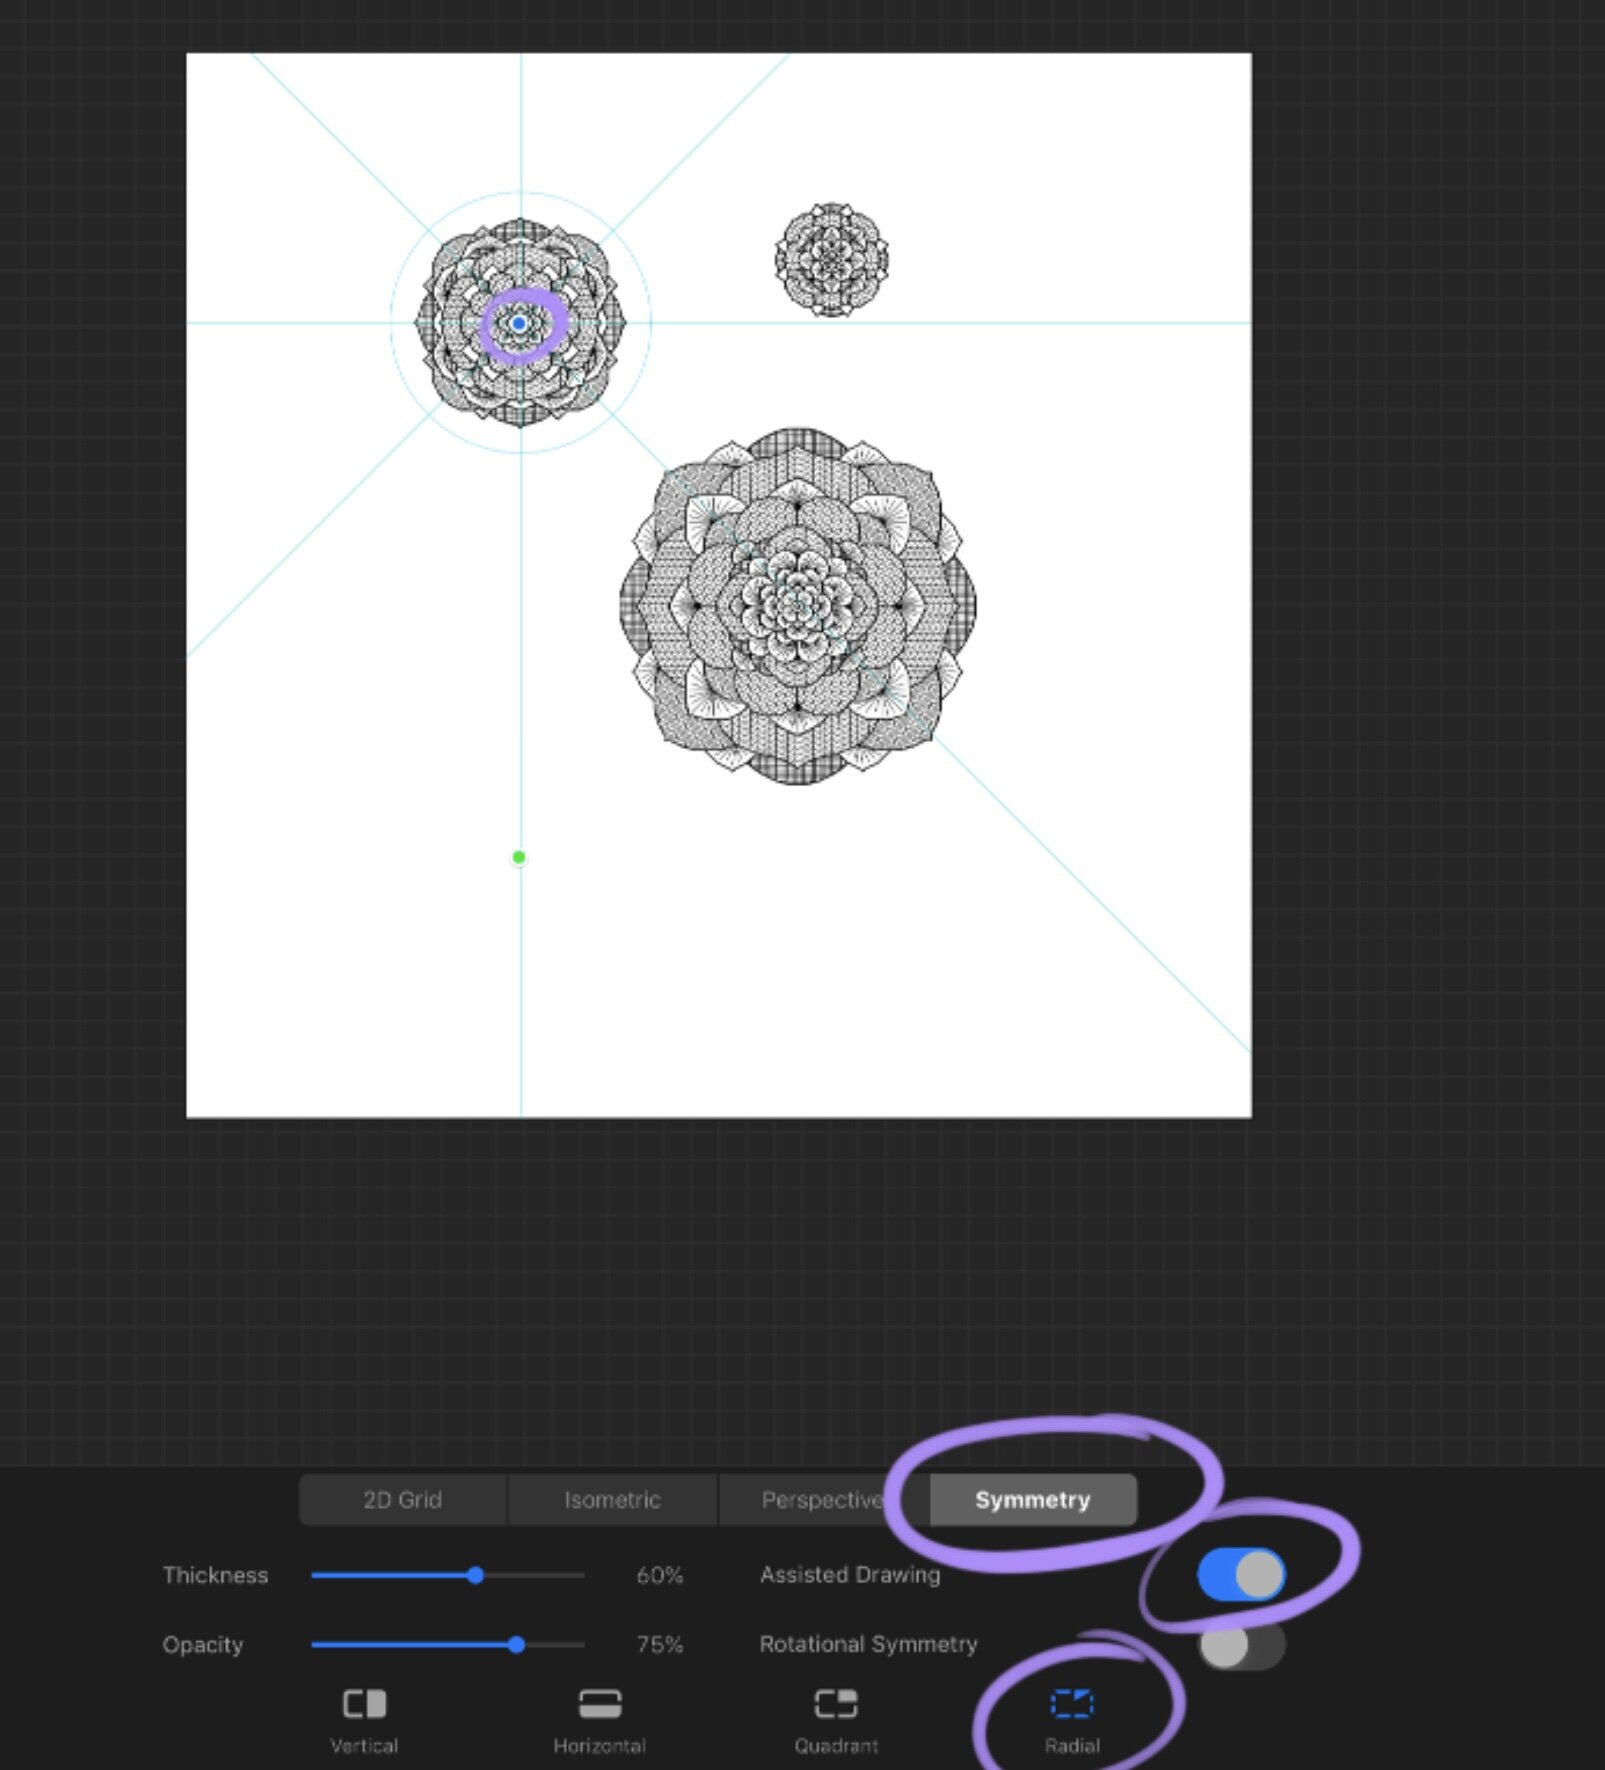
The green lines on the canvas represent the drawing guide, for this piece they are marking my lines of symmetry. The blue dot in the centre of those lines is what I can now use to move the symmetry where I want it for what I’m drawing. (For this piece I repositioned it at the centre of each mandala while I was working on it.)
Notice that at the bottom of the screen you can see lots of settings. For this mandala piece I was using the radial symmetry setting with assisted drawing on. Another useful function I have used in the past is a grid to keep my lines straight.
The assisted drawing function is a very useful tool. It allows you, while working with symmetry, to not only see your lines of symmetry but to draw simultaneously in all of the repeated sections. When I drew these mandalas, even though each part of them is repeated 4 times, I only had to draw each type of section once.
You have to really mess around with this one a bit to understand it but I definitely recommend doing so at some point!
As I say, this is just skimming the surface of what you can do with this app but there are all of the tools that I use on a regular basis when I am designing.
Have a play around with these ones and then try out some more for yourselves!
Maybe once I’ve expanded my knowledge a bit I’ll do an update for you…