
The Use Any Yarn Dice Bag - Free Crochet Pattern
Where are my fellow RPG players at?
My partner, Sam, got me into playing them last year and I’ve really enjoyed trying out lots of different systems and campaigns. At the moment we’re playing Legend of The 5 Rings and being a Crab has been so much fun… I mean chaos, haha
If you’ve ever even slightly dabbled in RPG’s then you’ll know the importance of a good dice bag! So when my brother asked for a dice set for his birthday and it arrived without a bag, I knew what I had to do and headed to my yarn stash

This pattern is fully adjustable and you can use any yarn! Yep, its really that simple
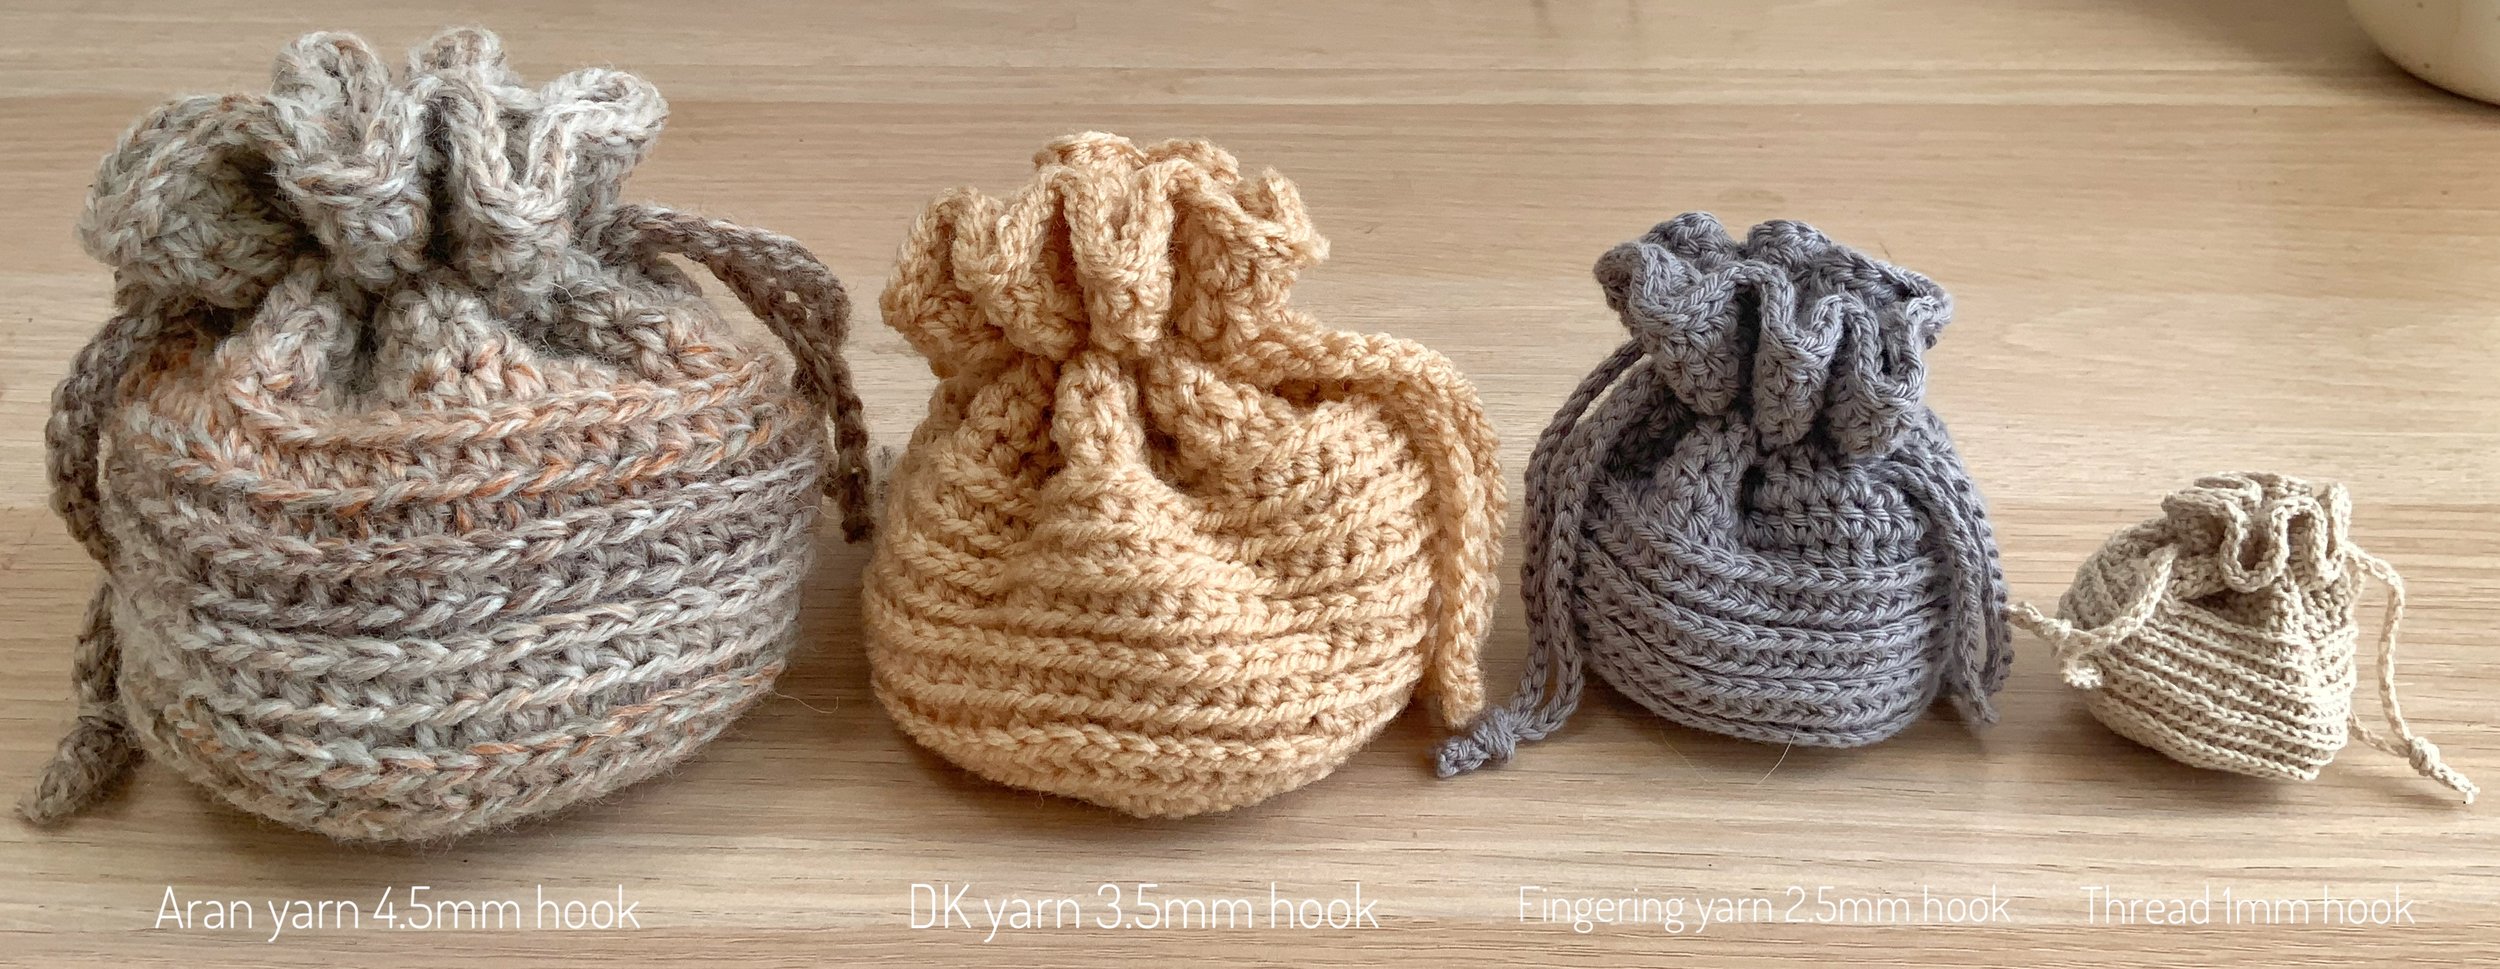
The written pattern here is the one I used in all of my example bags shown below, but if you want to make it bigger or smaller the possible adjustments to the pattern are shown at the end of each section
The largest two bags can hold many dice sets, the grey bag is perfect for 1-2 sets and the thread weight bag would be great for a really special D20
The pattern is provided in US terms and takes 1-3 hours to complete, depending on the yarn chosen and size of the bag.
There is no gauge needed for this pattern as you’re going to adjust the size of the bag as you work anyway
Skip to the end for the tutorial video
Skill level:
Recommended for keen beginner/intermediate
Stitches:
Magic circle
sc - single crochet
dc - double crochet
hdc - half double crochet
sl - slip stitch
You will need to crochet into the back loop only (blo) and third loop only (tlo) for the main section

Method:
The bottom of the bag:
start with a magic cirle
Row 1 - sc 6 into magic circle and close, sl to 1st sc
Row 2 - 2 sc into each stitch from previous row, sl to 1st sc
Row 3 - 1 sc, 2sc in next stitch - repeat round, sl to 1st sc
Continue stitching rounds using this pattern until the Botton of your dice bag is the desired size - sc (row number -2), sc 2 in next stitch, repeat round, sl to 1st sc
For the last row, DO NOT sl join
For my example bag I did 9 rows
The main section:
This section is worked in continuous rounds
Insert your hook into the sl join of the previous row, yarn over and pull up a loop, insert your hook in the blo of the 1st sc of the previous row, yarn over and pull up a loop. Now yarn over and pull through all 3 loops on your hook. You are not set up st start working in continuous rounds
blo hdc in each stitch around, until you have reached the join in the previous step
tlo hdc in each stitch around, until you reach the last blo hdc from the previous step
blo hdc in each stitch around, until your reach the last tlo hdc from the previous step
Continue in this way until your bag has reached the desired height, then sl to next stitch. Keep in mind that the closing section will add an additional 6 rows of stitching
For my example bag I stopped when I had 4 bands of tlo hdc
The closing section:
You will now be working in joined rounds again. This section is the same for all sizes and adjustments
Row 1 - chain 1, hdc in same stitch as sl you just made, then in each stitch around, sl to 1st hdc
Row 2 - chain 1 hdc in each stitch around, sl to 1st hdc
Row 3 - chain 2, dc in the next 2 stitches, chain 1, skip next stitch, *dc in next 3 stitches, chain 1, skip next stitch* repeat until end of row, sl to beginning chain 2
If the maths doesn’t quite work on this row don’t worry, just do 2 dc in stead of 3, or add an extra dc after the last chain space if you need
Row 4 - chain 1, hdc in each stitch around and 2 hdc in each chain space from previous row, sl to 1st hdc
Row 5 - chain 1 hdc in each stitch around, sl to 1st hdc
Row 6 - sl in each stitch around then tie off
The ties:
Make 2 lengths of cord, about 2 inches longer that the circumference of the closing section row 3 with holes in it
Making this cord is a little fiddly so if you would prefer an easier option, simply take 6 strands of the yarn you were using for the bag, and make a plait using 2 strands in each section
Start with a long tail, 1/2m to 1m depending on the yarn you’re using (thicker yarn will need a longer lenth)
Make a slip knot in the yarn leaving the long tail
Place your working yarn in your hand as normal and hold the yarn tail underneath the working yarn with that hand as well, pink the slip knot

In a smooth motion, keeping tension on both the working yarn and yarn tail bring your hook under the yarn tail downwards to catch it, then up and under the working yarn then back towards you over the working yarn to catch it.
Now draw the working yarn through the 2 loops on your hook. Repeat to form a length of cord
assembly
Well not really assembly cause there’s not a whole lot that needs assembling!
Weave each tie around the bag through the holes, in one and out the next. Once you reach the start of the tie again, knot the ends together
Repeat with the second tie making sure that the knot will end up opposite that of the first tie and wherever the first tie was woven on the outside, this tie goes in etc. This will ensure a nice firm gather to the bag

These bags don’t have to be used for dice!
They would work perfectly as gift bags for jewellery, sweets etc.
Or a lovely way of storing special keepsakes
Part of my wants to make a really huge one to use as a backpack… I’d have to work out how to add straps but it can’t be that hard, right?
Well, anyway, whatever you choose to use them for: